|
CLIENT INSTRUCTIONS |
KB269: General (Secure) Wireless Access – Initial Setup and Login
|
|
PRIMARY KNOWLEDGE AREA |
Wireless |
Related documents:
KB268: Hot Spot (Unsecured) Wireless Access – Initial Setup and Login-Long
KB272: Hot Spot (Unsecured) Wireless Access- Initial Setup-Short
KB273: General (Secure) Wireless Access- Initial Setup Short
A printer-ready version of this document is available in (PDF format, 22 pages).
Purpose:
Wireless Initial Setup sets the parameters and options associated with wireless networking for a single account on your laptop (your login account). The setup enables you to make wireless connections to the Middlesex Community College (MCC) computer network. If you plan to use multiple laptops or several accounts on the same laptop, you would need to set up these parameters for each account on every laptop.
For your convenience,
the login procedure has been included in this document after the initial setup
procedure.
Prerequisites:
· Laptop with Windows XP (with up-to-date patches for Windows XP)
· Wireless card or onboard wireless - supporting 802.11a, 802.11b, or 802.11g standard
· Valid network login id (username and password)
Note: Wireless cards that are inserted into the laptop require installation of driver software on the laptop before using the card. If this is the first time you are using your wireless card, be sure the driver software has been installed before proceeding. Driver software is shipped on a CD with the card or instructions are provided for downloading it from the company’s website.
Overview:
The wireless infrastructure of the college supports multiple methods or tiers of access. An MCC member can choose from Hot Spot access (Internet only), General access (Internet and general MCC services and applications access), and Administrative access (for MCC faculty and staff members). Each tier implements an increasingly powerful method of authentication and authorization.
General wireless access is for the Middlesex Community College (MCC) student, instructor, staff member, or other member of the MCC community whose requirements for a session include email, general MCC services, the MCC intranet, or access to the Internet. General wireless access provides secure encrypted access from the laptop to all destinations.
General access is a secure and encrypted type of wireless access, to be used when your session requirements include access to the MCC network or you want secure encrypted access. To obtain General access you login to your own MCC network account with your username and password.
Outline of Procedures in this Document:
These procedures instruct you on how to setup and mange wireless networking on your laptop through Microsoft Windows software. Windows is a common feature of all MCC supported laptops and is the most efficient way for MCC to provide assistance and support. You may see wireless management software from the manufacturer on your laptop, but since the software varies between manufacturers it is not the recommended method to use.
I. Wireless Initial Setup Procedure
A.
Navigating to the Wireless Network Connection Properties
B. Setting the Wireless Network Connection Properties
C. Adding General Access to Preferred Networks List
D.
Setting Protected EAP Properties
E. Closing-Up and Having Changes Take Effect
F.
Connecting to a Wireless Access Point
III.
Wireless Logout Procedure
IV.
Network Icon Not Present Procedure
Preparation:
1. Disconnect any network cables from laptop.
2. Startup the laptop.
3.
Insert
your wireless card (if you do not have onboard wireless).
Wireless Initial
Setup Procedure:
Starting Point: Your Windows XP desktop window is displayed.
A. Navigating to the Wireless Network Connection Properties
1. Determine if there is a network icon (two monitors) present in the system tray portion of the bottom taskbar on your desktop window.
Hint: Click the ![]() on the system tray to
see any hidden icons. Re-click to
re-hide.
on the system tray to
see any hidden icons. Re-click to
re-hide.
![]()
Figure 1 - Network Icon circled
If there are two network icons present, you can use either one. The Wireless Connection icon and the Local Area Connections icon share some of the same options. Is there a network icon in the system tray?
YES --> Continue to next step.
NO --> Continue to Network Icon Not Present Procedure near the end of this document.
2. Right-click a Network icon in the system tray of your desktop window.
3. Select the Open Network Connections option from the dropdown menu.
The Network Connections window displays.
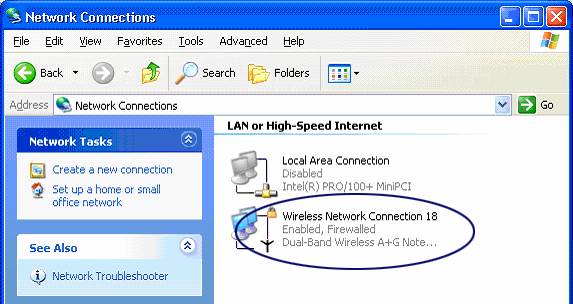
Figure 2
4.
Right click the Wireless Network Connection [number]
entry.
Note: The [number] referred to above also appears in some of the window titles. It is simply a counter as to how many times the wireless card has been reinstalled. This counter does not appear unless the card has been reinstalled at least once.
A dropdown menu displays.
5.
Is
the first item on the dropdown menu Enable?
YES --> Click it.
NO --> Continue to step 7.
A small message box displays with the message “Enabling” and then “Enabled” before automatically closing.
Note: For laptops users who have not used wireless before or for those that have previously turned wireless access off, this step ensures that wireless access is turned on or enabled before proceeding.
6.
Right
click the Wireless Network Connection [number]
entry again.
The first item on the dropdown menu is Disable. A dropdown menu displays.
7.
Click the Properties option on the dropdown menu.
The Wireless
Network Connection [number] Properties window displays.
B. Setting Wireless Network Connection Properties
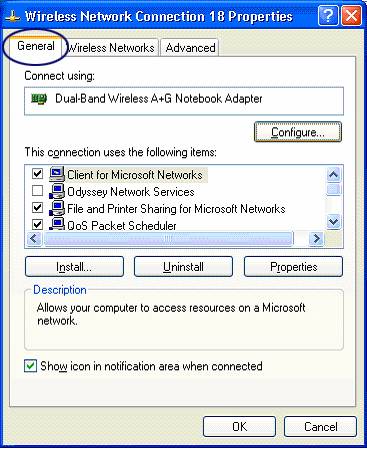
Figure 3
1. Click the General tab, if the General tab is not the default tab displayed.
2. Near the bottom, ensure the checkbox Show icon in notification area when connected has a checkmark.
Note: Having a check in this checkbox causes the Wireless Network icon to appear in the system tray of the desktop window and allows you to avoid having to use the Network Icon Not Present Procedure for Wireless Access to setup wireless.
3. All other selections should remain unchanged.
4. Click the Wireless Networks tab.
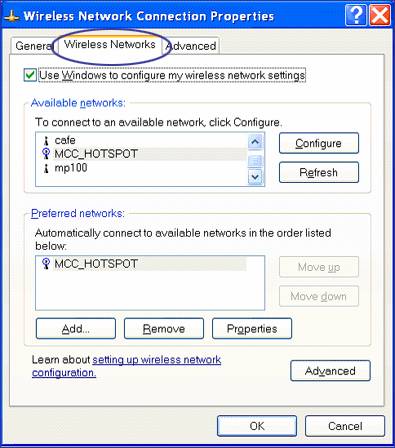
Figure 4
This tab shows lists of the currently available networks and your currently preferred networks. MCC_HOTSPOT is the identifier for Hot Spot access to the college’s network. MCC_HOTSPOT would appear in the preferred networks list if you have already used the Hot Spot wireless access. Other wireless networks not associated with the college may appear in the Available networks list if you are in close proximity to them.
5. Ensure the checkbox Use Windows to configure my wireless network settings has a checkmark.
6. Click the Advanced button near the bottom of the tab (not the Advanced tab).
An Advanced popup window displays.
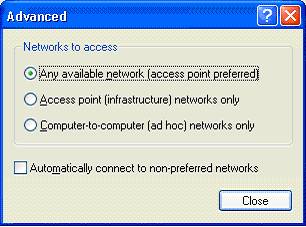
Figure 5
7. Ensure the radio button Any available network (access point preferred) is the only option selected or checked.
8.
Click Close.
C. Adding General Access to Preferred Networks List
1. On the Wireless Networks tab, if “MCC_HOTSPOT” appears in the list of Preferred networks, click MCC_HOTSPOT to highlight it and click the Remove button.
MCC_HOTSPOT was on the Preferred networks list to provide wireless access for a previous session. Failure to remove it from the list results in the laptop automatically using the Hot Spot wireless connection instead of the General wireless connection that you are setting up.
2. On the Wireless Networks tab, under the Preferred networks heading, click Add button.
The Wireless network properties window displays with Association and Authentication tabs. The Association tab should be selected.
3. Enter the Network name (SSID): MCC_GENERAL and press TAB key (case is important!)
MCC_GENERAL is the identifier for General access to the college’s network.
4. Ensure the values selected from the two dropdown lists are:
Network Authentication: Open
Data encryption: WEP
5. Ensure the checkbox The key is provided for me automatically has a checkmark.
The data should look the same as in Figure 6 below.

Figure 6
6. Click the Authentication tab.
7. Ensure the checkbox Enable IEEE 802.1x authentication for this network has a checkmark.
8. Select Protected EAP (PEAP) from the dropdown list for EAP type.
9. Ensure the last two checkboxes are NOT checked.
The data should look the same as in Figure 7 below.

Figure 7
D. Setting Protected EAP Properties
1. Click the Properties button.
The Protected EAP Properties window displays.
2. Ensure the Validate server certificate checkbox is NOT checked.
3. Ensure the Enable Fast Reconnect checkbox has a checkmark.
4. All other selections or options should NOT be checked
The data should look the same as in Figure 8 below.
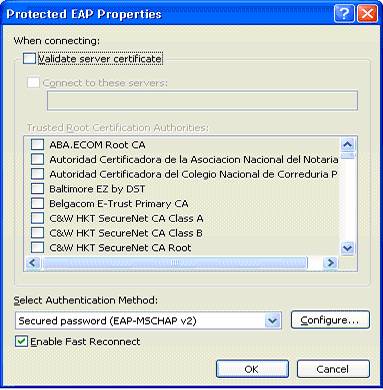
Figure 8
5. Click the Configure button.
The EAP MSCHAPv2 Properties window displays.
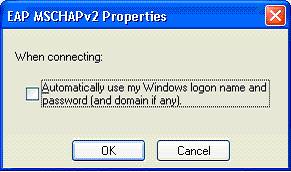
Figure 9
6.
Ensure the Automatically use my Windows login… checkbox is NOT checked.
7.
Click OK.
The window closes.
8.
Click OK.
The Protected EAP Properties window closes.
E. Closing-Up and Having Changes Take Effect
1.
Click OK.
The window displaying the Authentication tab closes. The Wireless Network Connection [number] Properties window showing the Wireless Networks tab is displayed.

Figure 10
The MCC_GENERAL network has been added to the Preferred networks list.
Note: The software searches for networks-to-connect-to starting from the top of the Preferred networks list. Placing the network you are about to connect to at the top of the list minimizes the time to connect. If you keep multiple preferred networks on the list, use the Move up and Move down buttons (in the window) to change the order of the networks on the list.
2. Click OK to close the Wireless Network Connection [number] Properties window.
The Wireless Network Connection [number] Properties window closes. The changes you have made take effect.
3. Close any remaining open windows to return to the desktop window.
A balloon message may arise from the Wireless Network icon.
F. Connecting to a Wireless Access Point
Starting Point: Your Windows XP desktop window is displayed. Please wait a minute or two before starting if a balloon message similar to one in figure 11 or figure 12 has yet to appear.
1. The first step to take depends on what you see on your screen:
A. Is there a balloon message arising from the Wireless Network icon on the system tray that includes, “Click here to select a certificate…to the network MCC_GENERAL”?
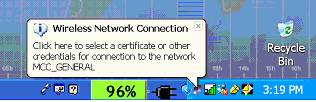
Figure 11
YES, I have this balloon message -- > Continue to step 7.
B. Is there a balloon message arising from the Wireless Network icon on the system tray that includes, “Connected to: MCC_GENERAL…”?
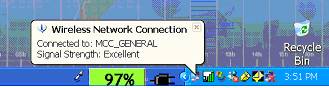
Figure
12
YES, I have this balloon message --> You are connected to a wireless access point. Continue to Wireless Login Procedure.
C. There is no balloon message at all --> Continue to next step.
2. Right-click the Wireless Network icon in the system tray of your desktop window.
3. Select the Open Network Connections option from the dropdown menu.
The Network Connections window displays.
4.
Select the Wireless Network Connection entry.
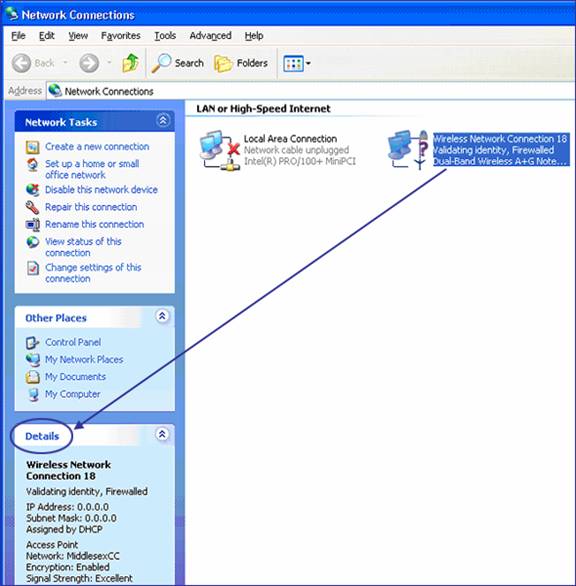
Figure 13
When the Wireless Network Connection entry is highlighted, details of the connection display under the Details heading in the lower left portion of the window.
Note: The following lines in the Details section can be quite helpful in providing key information about the state of your connection.
§ The line after Wireless Network Connection [number] tells you the status of your connection. “Authentication Succeeded” indicates you have a successful connection (see next step).
§ IP Address: a number assigned to you by the network. An address of all zeroes indicates you do not yet have a successful connection.
§ Access PointNetwork: which wireless network your laptop is using for making a connection.
§ Signal Strength: indicates whether you have a reliable signal; a rating of “good” or higher is sufficient.
5.
If the line in the Details
section after Wireless Network Connection
[number] says “Authentication
Succeeded” and the Access Point Network line says “MCC_GENERAL” your connection to a wireless access point has been
established, so continue to the next procedure: Wireless Login Procedure. Otherwise, continue to the next step.
6. Double-click the Wireless Network Connection entry.
The process of establishing a connection to an access point usually takes 15 seconds or less, but it can be 60 seconds or more depending on the circumstances, so please be patient. Messages that flash on your screen for a second or two during this process should be considered as intermediate and informational messages that will not necessarily reflect the final status.
A balloon message arises from the Wireless Network icon in the system tray.
§ are logging in wirelessly for the first time to MCC_GENERAL using this account on this laptop
§ have changed the password to your account since last wireless login
§
removed MCC_GENERAL from the Preferred networks
list and added it back
a balloon message displays similar to the one below
Figure
14
YES, I have this balloon message --> Continue to step 9.
8.
If this is the second time or
greater that you are wirelessly logging in using this account on this laptop
then a balloon message displays similar to the message below
Figure
15
The message indicates that a
successful connection has been made to MCC_GENERAL.
YES, I have this balloon message --> Continue to step 10.
Note: Signal strength may vary. Excellent, very good, or good indicates a reliable signal. A fair or poor rating may eventually result in a dropped connection.
9.
Click the balloon message.
The Enter Credentials (login) window displays.
Note: First-time wireless logins to MCC_GENERAL, accounts with newly changed passwords, and removing/re-adding MCC_GENERAL to the Preferred networks list are cases that require this additional login entry of username/password.

Figure
16
10. Enter the User name and Password for your network account leaving the Logon domain blank; click OK.
When a successful connection is made to MCC_GENERAL a balloon message displays above the Wireless Network icon in the system tray similar to the message below.
Figure
17
Note: Signal strength may vary. Excellent, very good, or good indicates a reliable signal. A fair or poor rating may eventually result in a dropped connection.
You have successfully completed
the General wireless setup!
Wireless Login
Procedure:
This login procedure assumes MCC_GENERAL is already on the Preferred networks list as a result of performing the Wireless Initial Setup procedure. If you have removed MCC_GENERAL from the Preferred networks list, go back to the beginning of the Wireless Initial Setup procedure and redo the steps pertaining to adding MCC_GENERAL to the list. You will also need to redo the last section of that procedure, Connecting to a Wireless Access Point to login to the wireless access point and re-establish a connection.
To verify you have an established connection to MCC_GENERAL, place the cursor over the Wireless Network icon on the system tray. An icon tag appears briefly with the following information if you have a connection:
Wireless Network Connection (MCC_GENERAL)
Speed: xxx Mbps
Signal Strength: xxx
(“xxx” indicates variable information)
If you have a connection to MCC_GENERAL then you may proceed to login.
1. Open a web browser of your choice.
Depending on your browser settings, the following security alert may appear.

Figure 18
2. Click OK, if it does appear.
Another security alert message may also appear.

Figure
19
3. Click Yes to this Security Alert message, if it does appear.
The MCC login network page displays regardless of whether any Security Alert messages appear.

Figure 20
4. Under the Registered Users heading, enter the User Name/Password for your network account and press Enter or click Log In.
A bluesocket message box displays and your designated home webpage.
5. Minimize the bluesocket message box. Do NOT close it.
You have successfully logged in using a General
wireless connection.
Note: If you use both
MCC_HOTSPOT and MCC_GENERAL wireless networks and keep both on the Preferred
networks list, you need to be aware of the selection behavior from that
list. Every time you use the laptop on
campus, the wireless software automatically tries to connect to MCC_HOTSPOT over
MCC_GENERAL. The only way to override this
behavior and use MCC_GENERAL is to remove MCC_HOTSPOT from the Preferred
networks list. There is a Remove button
on the Wireless Networks tab (see figure 4) to remove networks from the list
(see step 1 of the section, Add General Access to Preferred Networks List in
Wireless Initial Setup Procedure).
Wireless Logout Procedure:
When
you’re finished using the wireless connection and are ready to logout:
1. Click the bluesocket button on the task bar at the bottom of your desktop window.
The bluesocket message box redisplays (you previously minimized it).
2. Click the Click to Logout text.

Figure 21
Your connection is terminated.
You
have successfully terminated your General wireless connection.
Network Icon Not Present Procedure:
If options on your laptop are not set up to display the Wireless Network icon in the system tray of your desktop window, you take the following steps to reach the windows that control your laptop’s wireless settings.
1. At the desktop window: Click Start --> My Computer.
The My Computer window displays.
2. Under the Other Places heading: Click My Network Places.
The My Network Places window displays.

Figure 22
3. Under the Network Tasks heading: Click View network connections.
The Network Connections window displays.

Figure 23
This is the same window that opens in step 3 of the section, Navigating to the Wireless Network Connection Properties in the Wireless Initial Setup procedure.
Continue at step 4 in the Navigating to the Wireless Network Connection Properties section of the Wireless Initial Setup procedure.